Saturday, June 14, 2014

Cheeseburger Hot Pockets


My husband is gone a lot. I mean A LOT. He works 6 days a week and often gets held over and has to work overtime through dinner. On top of his "regular" job he also is in the Marine Corps and is often gone for that. This year alone he has already been at training 3 weeks and is currently doing 2 more. So my 3 Things and I are used to flying solo. For most of the day things are pretty easy and we just go with the flow... but I dread dinner time when the hubby is not at home. The big boys are always "starving" and it's usually the baby's fussiest time of the day (yes, he does get fussy). So I am always trying to come up with recipes that are easy and kid friendly that my boys will eat. Tonight, we hit the jackpot! We just got back from being up in the Pacific Northwest for the past week and the refrigerator was pretty bare. I had a can of biscuits, some cheese, and some ground turkey in the freezer... and Cheeseburger Hot Pockets is what I came up with!

Ingredients:
  • 1 lb ground turkey
  • 1 tsp Minced Onion
  • Lawry's Seasoning Salt
  • 1 can Reduced Fat Flaky Grands Biscuits
  • 8 slices cheese (I used Colby Jack)
Directions:
Preheat oven to 400 and spray baking sheet with nonstick spray. In a large saute pan add ground turkey, minced onion, and season with Lawry's Seasoning Salt. Brown turkey on medium heat until cooked through.

Split a biscuit in half and flatten out each half. Place meat mixture on bottom half, lay a slice of cheese on top of meat, and cover with top half of biscuit. Press down edges and use a fork to seal. Repeat with remaining biscuits, meat, and cheese. Pierce top of pocket with fork.

Bake for 10 minutes or until tops of pockets are golden.


Saturday, May 24, 2014

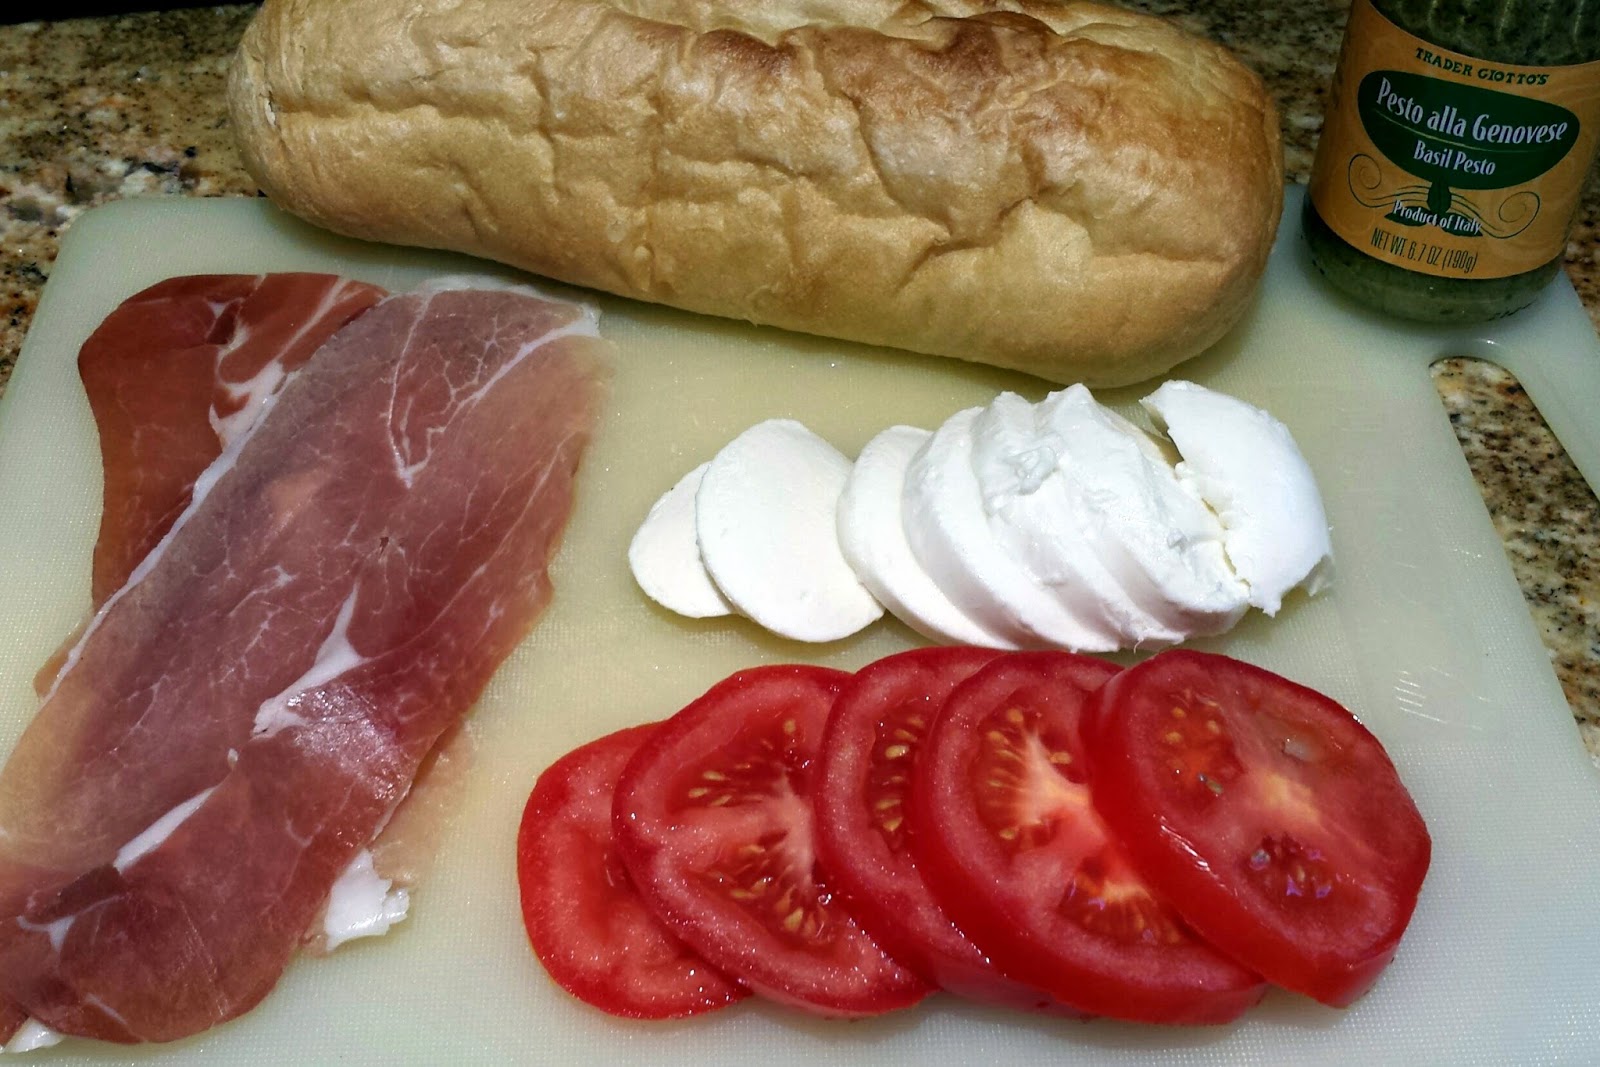
Prosciutto, Tomato, and Mozzarella Bruschetta


This is a great side or appetizer to add to any meal. It's one of those things that I just made up based on some ingredients I had on hand. My family loves it and whenever I have made it for dinner guests it has always been a hit. This is really easy and can be pre-assembled so all you have to do is throw it in the oven right before dinner is served. I typically use my toaster oven for this recipe.

Ingredients:
  • Fresh loaf of bread (ciabatta, french, sourdough, etc)
  • Pesto sauce
  • Prosciutto slices cut in half
  • 1 large tomato on the vine
  • 1 fresh mozzarella ball
Directions:
I typically slice my tomato first to see how many slices I'll get out of it and then that's how many slices of bread, mozzarella, and prosciutto I'll cut.

Spread a small amount of pesto on each slice of bread. The place one half slice of prosciutto on the bread. Next layer a slice of tomato, and then top with the mozzarella.

Place in toaster oven directly on rack. Turn oven on broil and cook until cheese is melted and starting to get a golden tint on top. Carefully pull out of oven, it will be hot!! Serve and enjoy!

Pork Tenderloin with Cherry Sauce


So between Thing 1's birthday, our Carlsbad/Legoland trip and then getting sick with a stomach bug, there hasn't been much cooking going on around here. Until today! Back before I "retired" from teaching to be a stay at home mom, one of my friends and coworkers shared the results from this recipe with my teammate and I at lunch one day. Let me tell you, it was delicious! We could not stop eating it and I just had to get the recipe from her. It came from the "Everyday Paleo" cookbook by Sarah Fragoso. I modified the recipe because my tenderloin was larger than the one called for in the recipe. No joke, this recipe is sooo good! And the pork doesn't get dried out at all. My kids just gobble it down too! So it is definitely a winner around here.

Ingredients:
  • 1 1/2 Tbsp olive oil
  • 2 1/2 lb pork tenderloin
  • Salt and pepper to taste
  • 2 cups chicken stock or broth
  • 1/2 cup balsamic vinegar
  • 1/2 lb dried cherries
  • 2 sprigs of fresh rosemary
Directions:

Heat olive oil in skillet on medium low to medium heat. Cut tenderloin in half so it will cook faster and more evenly. Season with salt and pepper. Place tenderloins in skillet and brown on all sides. It should have a nice golden brown color. Add chicken stock, blasamic vinegar, cherries, and rosemary. Continue cooking in skillet for about 30-35 minutes turning the tenderloins periodically.
While the tenderloins are cooking, it is the perfect time to prep some of my Prosciutto, Tomato and Mozzarella Bruschetta to accompany the tenderloin.

Remove tenderloins and cover with foil. Continue cooking the sauce in the skillet until stirring continually until it has a syrup consistency (about 3 minutes). Discard rosemary. Slice tenderloin and pour cherry sauce over top. Serve and enjoy!!


Sunday, April 27, 2014

Grandma H's Cereal Snake


Another one of my summer favorites from spending the summers in the mountain with my grandparents was "Cereal Snake". This is basically homemade chex mix, but it's called cereal "snake" because when my Dad was a kid, his cousin spelled it "snake" instead of "snack" in a letter he had written. Of course he was only 6 or 7 at the time... but "snake" stuck and so the "cereal snake" tradition continued on when we were kids.

I can still remember how good this smelled cooking in the oven and we always looked forward to having a little bowl of it every afternoon during the summer. I plan on making it this week for a playdate I'm doing for Thing 1 and some of his friends. I sure hope they like it as much as we did!

Ingredients:
  • 1 stick butter or margarine
  • 2 tbsp canola oil
  • 5 tsp Worcestershire sauce
  • 1 1/2 tsp Laury's seasoning salt
  • 1/4 tsp garlic powder
  • Just a splash of Tabasco sauce
  • 2 2/3 cups cheerios
  • 2 2/3 cups wheat Chex
  • 2 2/3 cups rice Chex
  • 1 cup stick pretzels, broken in half
  • 1 cup pecans or other nuts or bagel chips (if you want to make nut free)
Directions:
Melt butter. Add canola oil, Worcestershire sauce, seasoning salt, garlic powder, and Tabasco sauce.

In a separate bowl mix cheerios, Chex cereals, pretzels, and nuts. Pour butter mixture over cereal mix. Gently toss to coat over all the pieces.
Pour mixture on to a rimmed baking sheet. You can line your baking sheet with foil to make clean up easier. Bake in a 250 degree oven for 1 hour, stirring every 15 minutes.

By the way my Things loved helping make this recipe!


Sunday, April 20, 2014

Grandma H's Dump Cake


So it's Easter today and we really don't have any plans. For the first time in weeks we don't have to get in the car and drive anywhere. It's actually kinda nice. I'm getting laundry and dishes done and just spending time relaxing. So as is the norm when I'm sitting around doing nothing, I get a hankering to do some baking.

When I was a kid I used to spend my summers at my Dad's parents house up in the mountains in California. The lived in a little town called Meadow Valley outside of Quincy. Grandma H (otherwise known as Grandma Doggy) was always cooking and baking. One of my favorite desserts she used to make is soooo yummy and soooo easy to make. Of my Three Things only Thing 1 ever had a chance to meet his Great Grandma before she passed away 4 years ago. So I like to be able to cook and make her recipes to keep a little piece of her specialness a part of my boys life.

So on account of the fact that it's Easter I thought I'd make something special today and Grandma's Dump Cake seemed to be calling my name. The only problem... I don't have any ingredients on hand, so it looks like we'll be making a quick trip to the store afterall! ;)

This recipe is a pretty standard Dump Cake recipe and it comes out great every single time! I have only very minorly modified it by adding in just teeny bit of vanilla extract. The best part about it is that it is so easy to make that my Things can help make it too.

Ingredients:
  • 21 oz can blueberry or cherry pie filling
  • 8 oz can crushed pineapple (the can pictured is a 20 oz can because they were on sale and it was cheaper to buy that then the 8 oz. I just measured out 8 oz)
  • 1 tsp Vanilla extract
  • 1 box yellow cake mix
  • 1/2 cup chopped nuts (walnuts or pecans work great)
  • 2 sticks unsalted butter or margarine
Directions:
Preheat oven to 350 degrees. Spray 9 in square pan with baking spray.

Spread ingredients as they come from the box or can in order listed above (pie filling, pineapple, vanilla extract, cake mix, and nuts). Top with butter or margarine that has been cut into marble sized pieces.

Bake for about 40 minutes.

And that's it! You're all done. When top is golden brown take out of oven and cool in pan on cooling rack.

Saturday, April 19, 2014

Bunny Ears and a Kiwi Crate Update


So the hubby was gone for the three weeks leading up to Easter. Luckily I'm a planner and already had all my Easter and Easter basket fillers before he left so I didn't have to try and buy them when the boys were with me. One of our pre-Easter activities was an Egg Hunt for a play group we are apart of. I volunteered to organize the craft and came up with a super easy bunny ears craft for the Littles to do. This craft was great because I preassembled everything so that the day of the Egg Hunt there was very little for the kids / moms to have to do, but they got a really cute craft out of it.

I'm all about shortcuts and making things easier, not harder. So I freehand just drew an outline of the bunny ears. The larger one was for the outer white part of the ear and the smaller was for the inner pink part of the ear.

After making the template I traced it onto the pink and white papers and cut them out. Here's a couple tips for cutting things out when you need to cut multiples... when it's small enough fold the paper in half (which is what I did for the pink papers). This way you trace and cut less. Because the white part was bigger I could only fit three ears to a page and couldn't fold in half so I stapled the edges to keep the paper from shifting when I was cutting. I didn't need to staple the pink paper because when it is folded it will stay together when you cut it. I had to make fifteen sets so I needed 30 of each piece. With the pink I just folded all the paper together so I just had to make 5 cuts and I had all 3 pieces. Be careful about trying to cut too much at once. I could cut through about 6 pieces of paper. If you try to cut too much your cuts will get messy and your scissors won't be able to cut through it all.

The next step is to glue the pink center to the white outer ear. I used a glue stick to glue it because liquid glue will make it wrinkly and the glue stick will keep it smooth.

After that I glued the ears to the headband piece. Because I'm a former teacher I used a bunch of old sentence strips that I still had. I did use liquid glue for this step because it has a stronger hold and I didn't want the ears falling off. I just put a little at the bottom of the backside of the ear and stuck it on to the sentence strip. If you don't have sentence strips you can take a piece of construction paper, fold it horizontally or "hot dog" (so it's longer). Then cut along the fold. Staple or glue the ends of one side of each strip together to make a long band.

Then I just laid them all out to dry flat. The next step is what we did at our playgroup outing. Using the liquid glue I did a thin line through the middle of the exposed white part of the ear. Then I took cotton balls and stuck them in the glue. I pulled my cotton balls apart to spread them out and use less cotton balls. But you can just grab them and stick them too. I did one ear at a time so the glue didn't dry before I got them cotton balls stuck on. I don't recommend using a glue stick for the part. The cotton balls might stick at first but the glue won't old as log and they'll be falling off before you know it.


Now the only step left is to wrap around child's head to fit the band and then staple to hold the ends together. I don't recommend stapling while band is near child's head.

Now depending on how big kiddos head is, you may need some reinforcement on the back to keep the ears sticking up. You can use Popsicle sticks or straws. I just so happened to have straws at hand so I cut one straw in half and taped it to the ears.

Thing 1 didn't want anything to do with making ears at the Egg Hunt so he let me use his as an example for everyone else.

As you can see he was less than thrilled to be wearing the bunny ears!

Here are a few photos from the Egg Hunt! Here's our craft table all set up and ready to go!


Look at this Little! Isn't he just the most adorable thing ever?!


This is my friend who's the mom of the two twin Littles pictured in the bunny ears since my own Things were so uncooperative! Aren't they just the cutest? She's the super mom who coordinated the egg hunt for the play group!

Here's her other Little He's just a ham for the camera!


Now I have to be honest... if it wasn't for Thing 3 taking the longest nap ever and Thing 1 and 2 being distracted by a Kiwi Crate activity I don't know how I would have gotten this done. So here's the other project that came with our last Kiwi crate with the plants theme.

It was super easy and the boys could pretty much do it unassisted. First they had to color the flowers and plants. Then they punched them out and stuck them on pipe cleaners. After that they decorated the pots with modeling clay, put a little modeling clay in the bottom of the pot and stuck the pipe cleaners in the modeling clay in the pot.Super easy and fun and it kept them busy!


Thing 1's pots

 Thing 2's pots

 We made a garden!

And it was only fitting that we put our flower pots with our window garden. Can you believe how much these seeds have grown in two and a half weeks!? I love that every time I'm at the sink I get to see all this!

Thing 1's plants

Thing 2's plants